31 May 2007

How to make an Army men bowl


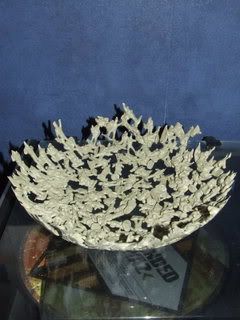
Way back in July of 2006 I posted about "How to make a hipster record bowl". Well after looking around for ideas and better tutorials I've decided it's time to post my new closely guarded secret of "How to make an Army men bowl".


  • Firstly recruitment. You may be lucky enough to have a large platoon of vintage Army men collecting dust somewhere, which is great because it is my belief that they just don't make Army Men from good plastics anymore. In any case you need quite a few depending of the size of bowl you plan to make and the only kind I could find here in any great number are called "Super Solider". I picked up 3 boxes each containing around 200 little newly drafted guys for $3.99 NZD a box. Not bad.
  • Next it's a good idea to find a suitable vessel/bowl that you can safely place inside the oven without freaking out if it all turns into a horrid toxic mess. *Tip no. 1. Take it from me. Save yourself lots of hassle, justification and just plain weird looks by not using any sentimental frying pans gifted to you from your Fiances parents to melt plastic toy soldiers in the oven ... but you know? On second thought, It's your call.
  • Preheat your oven to 150 degrees/300 Fahrenheit fan bake.
  • Once you have pulled these resources together you are almost there, but not before what might turnout to be the most frustrating part of the entire operation. Laying out the units. You need to carefully and intentionally cover the entire base (in my case a large metal mixing bowl) with men until you can start to building up and around the curvature of the bowl - But be careful sometimes lazy or bad placement of the men in unstable areas can create tumbling avalanches which will have you pulling your hair out and starting all over again, or worse giving up altogether.
  • Now once you have an aesthetically pleasing amount arranged in the bowl, (I like to build it up to the rim the whole way away around). Place your bowl carefully into the preheated oven for around 15 minutes on 150 degrees/300 Fahrenheit fan bake to evenly soften them up. Then turn up the temperature to 180C/350F, cut the fan and bake for a further 10 minutes or until you are happy will the fusing and melting. Be sure to keep a close eye on whats happening because things can change really fast. *Tip no.2 Remember, melting plastic creates a highly dangerous mix of toxic fumes (as my now Teflon lungs will testify too) so always cover your mouth and have access to good ventilation when doing this. Let me stress this point once more. This is no joke, you can kill yourself!
  • With an oven cloth, remove from oven and let stand, I always take it outside and leave it on the lawn to cool. As it cools the army men should start to harden and in the process start to pull themselves away from the bowl. Give it some time, you can hear it cracking as it pops away from the surface. After 10 or so minutes of cooling you should be able to gently work and pull the bowl out and admire the fruit of your efforts. You may have to bend the bowl to pop any stubborn Army Men not completely free. Be prepared to lose a few good men that haven't fused properly or have broken off while removing, don't fret too much though, they all knew what the risks were when they signed up.
And there you have it! Good luck Id love to see any finished bowls or any tips you may have gathered along the way. If you have any questions I might be able to help you with, feel free to ask. At Ease Soldier!

By Erueti Brown with 4 comments

30 May 2007

Your ticket to getting Lost.

Not to be confused with the television series or spin off game - Lost is a great creative idea for an invite only game currently blurring the boundary between the Internet and the real world.

The objective of Lost is simple enough: Get one point before your timer runs out or you are eliminated. Each time you gain a point your timer resets - if it reaches zero, you're out!

I wont go into explaining everything here, but if like me you're looking for any excuse to embrace creativity and original game play, then Lost is for you and here's your invite to all the fun!

By Erueti Brown with 1 comment

29 May 2007

FascinAsian # 313.

I love specialty Asian grocers.
Here are two items I recently discovered during a recent Saturday amble through the highly interesting and equally well priced aisles of the Asian grocer across from Pak'n'Save in Kilbirnie. Certainly well worth checking out if you ever find yourself out that way.


Naturally, I'm holding onto the "Bird's nest drink with flavoured artificial white fungus" for a suitable occasion should one arise.

By Erueti Brown with 1 comment

28 May 2007

It's not rocket surgery ...

Well obviously a considerable length of time has elapsed since I have been able to post any new updates to the blog - but to any of you who know me - All those allegations were proven to be 100% unfounded and may I also mention that the old adage "No body no crime" still applies in almost 60% of New Zealand criminal law cases resulting in an acquittal ...

And so with my new found freedom, let me kick things off a fresh with a little inspired project I have just finished working on and that I am quietly quite chuffed with ... if I don't say so myself.

Any person who has spent any reasonable time around me eventually realises I can be an embarrassing epic loser, and not only socially. Wallets, hats, keys and what must amount t0 several thousands of dollars by now - have all once been in my sole possession only to almost instantaneously end up fuck knows where?

Over time, I've found I tend to lose all the important stuff in my life while hoarding every worthless gimmick and piece of crap *Glenn/Sue: insert broken light box here - so from my POV it was only a matter of time before I finally married these two items together.

LEGO and keys.

Firstly if you have a cache of LEGO find some candidates you don't mind sacrificing for the greater good. Something simple like 2 or more bricks of different colours and something they can snap onto worked well for me, but I imagine LEGO being LEGO, the possibilities are endless.

The next part had me hunting around the house looking for any appropriate item I could use until I realised I could liberate the eyelet screws from behind one of our paintings hanging in the lounge. Once again more sacrificing for the greater good.

Next, I drilled a small starter hole into each LEGO so that I could work the eyelet screws firmly into the bricks. Once that was done I threaded two chains through the eyelets and attached the keys.

Lastly all that was left was to attach the LEGO base to the wall and Voila! And all done in under 10 minutes!

By Erueti Brown with 1 comment